When shopping for servers, you will often find that NAT servers are significantly cheaper than servers with dedicated IPs. This is particularly noticeable with residential IP servers, where prices can be less than 1/10th of a dedicated IP node. However, for beginners, merely understanding dedicated IPs is already a headache, let alone NAT setups which leave many completely clueless. This article aims to clarify the nature of NAT servers and provide practical usage workflows, enabling any beginner to fully master NAT servers after one read.
All recommendations in this article are subjective opinions based on my personal usage; please evaluate suitability yourself.
The article is divided into multiple chapters, each answering the following questions:
- What is a NAT server, and how does it differ from a standard Dedicated IP server?
- General workflow of using a NAT server?
- Practical examples across common NAT providers
- References & thoughts?
This is a popularize article designed for absolute beginners. All unfamiliar concepts will be explained in detail, requiring no external references to digest.
Unless specified otherwise, “IP” defaults to IPv4.
1. NAT Server Concepts
Before explaining NAT, let’s introduce standard servers (Dedicated IPs).
Every cloud server corresponds to a physical machine. The physical machine itself cannot be accessed directly from the internet because its exact position in the network isn’t defined. However, when we assign a Public IPv4 Address to this machine, anyone in the world can access it. Data packets from the internet can find this physical server utilizing this IPv4.
For instance:
Suppose you buy a server in a Japanese datacenter, and the provider assigns a public IP: 11.4.51.4. This IP binds directly to the server. Anyone visiting 11.4.51.4 on the internet will have their data packets routed directly to your server.
But you will quickly realize that relying solely on an IPv4 does not cover many daily tasks. For instance, if you want to run two services simultaneously on the server, how do others know which service they are accessing when visiting this IPv4? This introduces another concept: Ports. Different services can be assigned different ports for identification. For example, Service A uses port 443, and Service B uses port 8080. Thus, anyone wishing to use Service A visits 11.4.51.4:443, and for Service B, 11.4.51.4:8080.
TCP/IP specifications mandate that every IPv4 address possesses 65,536 ports (0–65535):
| Port Range | Name | Purpose | Example |
|---|---|---|---|
| 0-1023 | System Reserved Ports | Dedicated for common services | 80 (HTTP), 443 (HTTPS), 22 (SSH) |
| 1024-49151 | Registered Ports | Available for applications | 3306 (MySQL), 8080 (Fallback HTTP) |
| 49152-65535 | Dynamic Ports | Randomly assigned temporarily | Ephemeral ports used by browsers |
With this, you can visit any service running on a server possessing a public IP via Public IP:Port.
Now, you understand how Dedicated IP servers operate:
- The server possesses a dedicated public IP: 11.4.51.4
- All 65536 ports are entirely at your disposal
- Anyone worldwide can access your services via IP:Port
But! Is there a way for multiple servers to share a single public IP?
Enter Internal IP (Private IP).
Internal IP (also called Private IP or Local IP) is valid only within a local network, acting like an “internal employee ID”—unseen and inaccessible from the outside.
The previously mentioned 11.4.51.4 is a Public IP.
Public IP = office address “114 Baker Street, Tokyo, Japan”
- Anyone can locate the company using this address
- Globally unique; never repeating
Internal IP = Employee desk number “114F - Zone 5 - Desk 14”
- Known only to insiders
- Other companies might also have a “114F - Zone 5 - Desk 14”, creating no conflict
- Outsiders cannot locate this desk directly
The Internet Assigned Numbers Authority (IANA) reserves three Private IP address blocks dedicated to local networks. These IPs will never appear on the public internet:
| IP Block | Range | CIDR Notation | Available IPs | Common Application |
|---|---|---|---|---|
| Class A Private | 10.0.0.0 - 10.255.255.255 | 10.0.0.0/8 | ~16.77 Million | Large Enterprise/Cloud backends; common for NAT VPS |
| Class B Private | 172.16.0.0 - 172.31.255.255 | 172.16.0.0/12 | ~1.04 Million | Mid-tier enterprise networks; Docker default bridges |
| Class C Private | 192.168.0.0 - 192.168.255.255 | 192.168.0.0/16 | ~65 Thousand | Home routers |
Let’s look at another analogy for Public vs Internal IPs:
【Your Home Router】 ├─ Public IP: 11.4.51.4 (assigned by ISP, globally unique) └─ Internal IP Range: 192.168.1.0/24 ├─ Router Itself: 192.168.1.1 (Gateway) ├─ Your PC: 192.168.1.100 ├─ Your Phone: 192.168.1.101 ├─ Your iPad: 192.168.1.102 └─ Your smart cup: 192.168.1.103
To visit Google:
- Your PC (192.168.1.100) sends a request: “I want to visit Google”
- The router receives it and forwards it using its public IP (11.4.51.4)
- Google responds with data back to 11.4.51.4
- The router remembers that 192.168.1.100 made the request and forwards it back to your PC
This is the translation between internal and public IPs: multiple internal devices can access the world utilizing a single public IP.
Since a router can forward traffic for multiple internal devices through one public IP to access the network, can these internal devices be servers?
Congratulations, you understand the core mechanics of NAT!
Next, let’s look at exactly how NAT servers operate.
In computer networking, Network Address Translation (NAT) (also termed network masquerading or IP masquerading) is a technique for rewriting the source and/or destination IP addresses of IP packets as they pass through a router or firewall. NAT is a protocol for converting IP addresses in IP packet headers into another IP address. When IP packets pass through a router or security gateway, the router/gateway translates the source and/or destination addresses.
Simply put: NAT maps one public IP to multiple internal nodes, sharing an IPv4 exit.
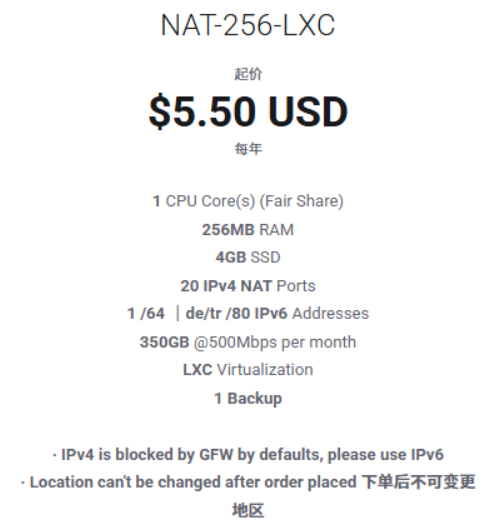
NAT machines offer an obvious benefit: they are cheap. Because you share a public IPv4 exit, you don’t bear the full IP cost alone. This is particularly extreme for residential machines: a $30/month residential IP becomes just $3/month if shared among 10 users, making it instantly affordable.
Of course, due to sharing an IP exit, NAT machines easily fall victim to IP abuse, leading to reports flying everywhere.
For example: Suppose I have an AT&T public IP 1.2.3.4 costing $30/month. Now I deploy 20 NAT servers and assign the first user (192.168.0.2) the port range 30001-30100:
Port Mapping Example:
1.2.3.4:30001→192.168.0.2:22(SSH Login)1.2.3.4:30002→192.168.0.2:80(Website)1.2.3.4:30003→192.168.0.2:443(HTTPS)1.2.3.4:30004→192.168.0.2:8080(EMBY)- … plus 30005-30100 available (100 ports in total)
At this point, visiting SSH simply requires ssh root@1.2.3.4 -p 30001.
If the user needs to host a service on port 8080, they map 1.2.3.4:30004 to 192.168.0.2:8080:
 Incorrect:
 http://192.168.0.2:8080(Internal IP, inaccessible from the outside) Correct:
 http://1.2.3.4:30004(Public IP + Mapped Port, access succeeds)
A public IP’s 65536 ports can never be fully exhausted; dividing 100 ports to each internal machine is more than generous, which is why NAT technology is so widely applied.
NAT VPS vs. Dedicated IP VPS
| Feature | Dedicated IP VPS | NAT VPS |
|---|---|---|
| Public IP | Dedicated | Shared (usually 10+ users) |
| Port Count | 65,536 | Allocated 10–100 or as needed |
| Price | ~$30/mo | ~$3/mo |
| IP Blocks / Abuse | Independent; strictly your concern | Shared burden; one violation affects all |
| Website Hosting | Easy | Difficult (requires non-standard ports) |
| Best Application | Regular Business | Learning, lightweight use |
2. General Usage Workflows & Mindsets
Since we already know the difference between NAT machines and dedicated IP machines, usage becomes very easy to understand.
Purchase NAT → Fetch Internal IP → Get Public Domain/IP → Add Port Mapping → SSH Debug → Deploy → DDNS (Optional) → Smooth sailing.
DDNS technology: Dynamic DNS—Updates domain resolution automatically when your public IP changes so you don’t manually inspect and adjust services on every IP rotation. Some vendors offer DDNS, while others omit it.
Determine if you need DDNS:
- Required: Vendor omits DDNS, and the public IP rotates
- Unnecessary: Vendor provides DDNS domain, or the public IP is static
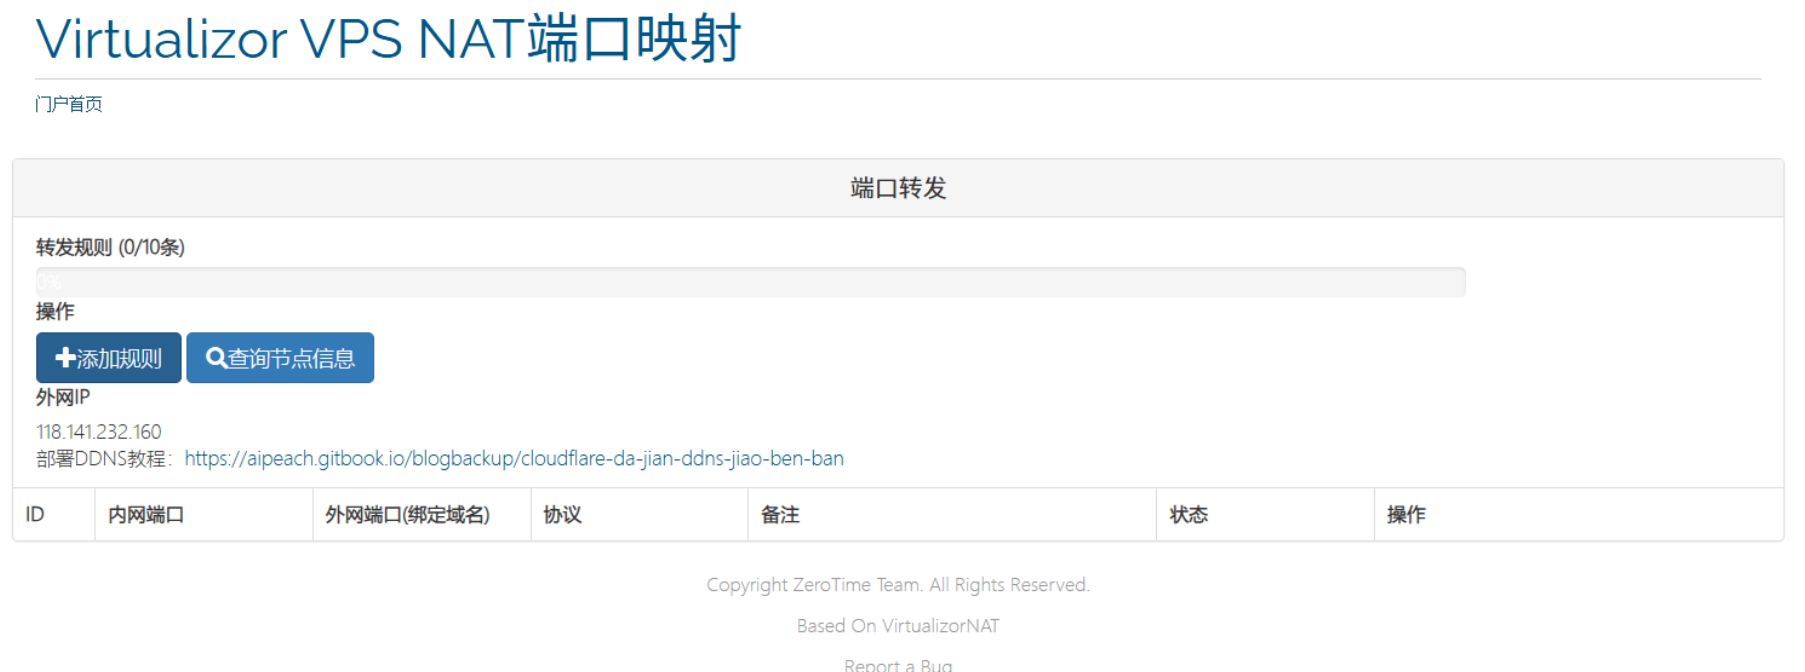
Prior to buying, verify how many ports the NAT machine provides; common layouts include:
|
|
Port Mapping Precautions
Following purchase, simply map ports as per the vendor’s guide. Generally, keeping internal and external service ports identical (e.g., Public IP:40001 → Internal IP:40001) is recommended to prevent configurations bugs on rigid services.
Why keep ports identical?
- Some applications hard-code port numbers; discrepancies induce crashes.
- Config files remain manageable with less clutter.
- Troubleshooting is smoother without recalculations.
When should ports differ?
- When your available range excludes the service’s default port.
- E.g., Your range is 30001-30100, but the service defaults to 8080.
- You can map
30004 → 8080, visitingPublic IP:30004from the outside.
Basic Port Mapping Steps:
- Verify Internal IP (via welcome email or control panel).
- Verify the port required by your target service.
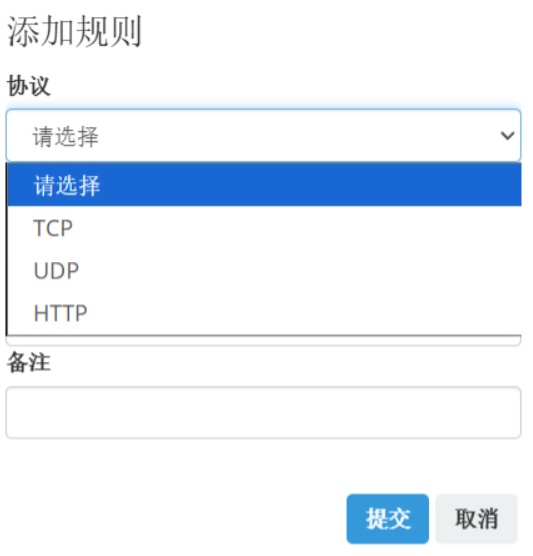
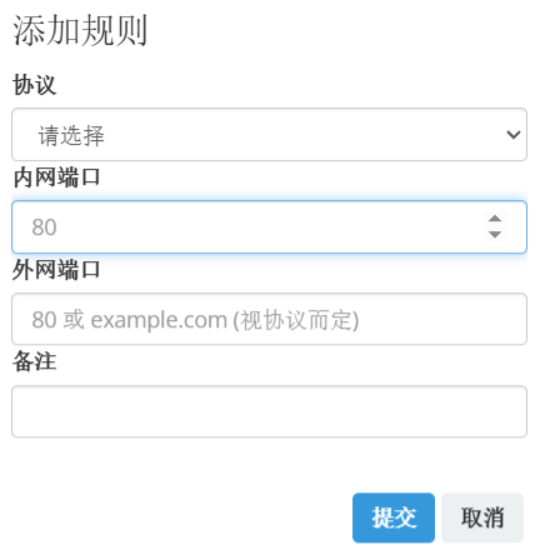
- Add mapping rule inside panel:
- Protocol: TCP (most services) or UDP (gaming/voice)
- Public Port: Choose one from your allocated range
- Internal Port: The port the service actually listens to
- Test SSH connectivity.
- Deploy and test the service.
3. Practical Walkthroughs
Finally, we arrive at the hands-on section! A thousand words cannot beat a single practical drill.
Below I will elaborate on my workflows and setups using common vendors as drill examples for beginners.
nmcloud
First, head over to the NAT purchase page:
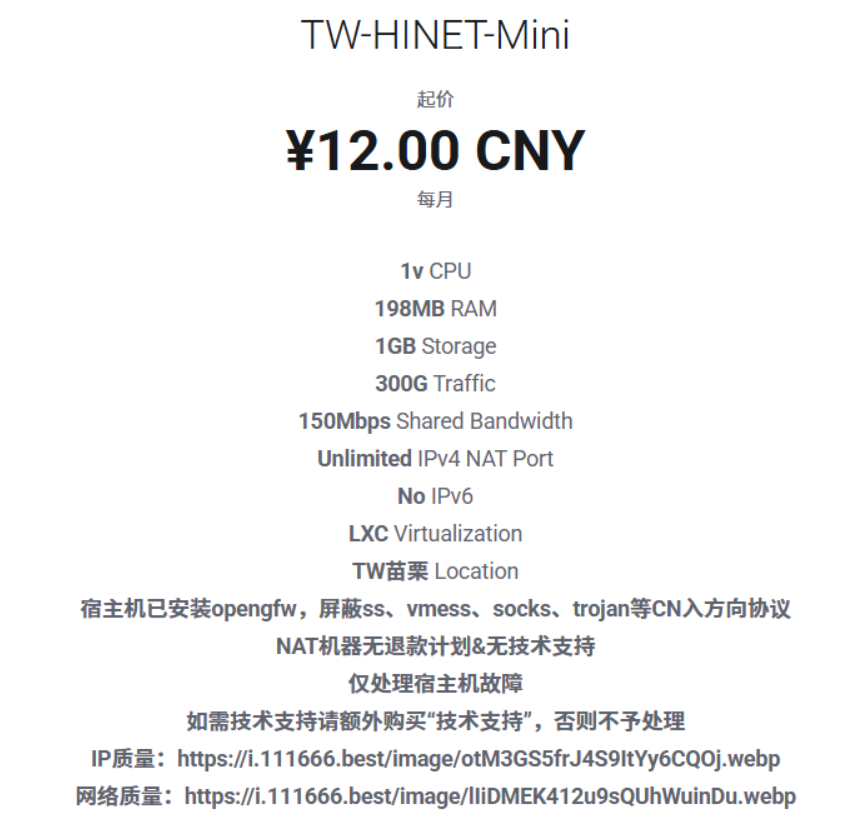
As seen, their policy reads Unlimited IPv4 NAT Port | No IPv6 address (meaning unrestricted mappings but zero IPv6 buffers).
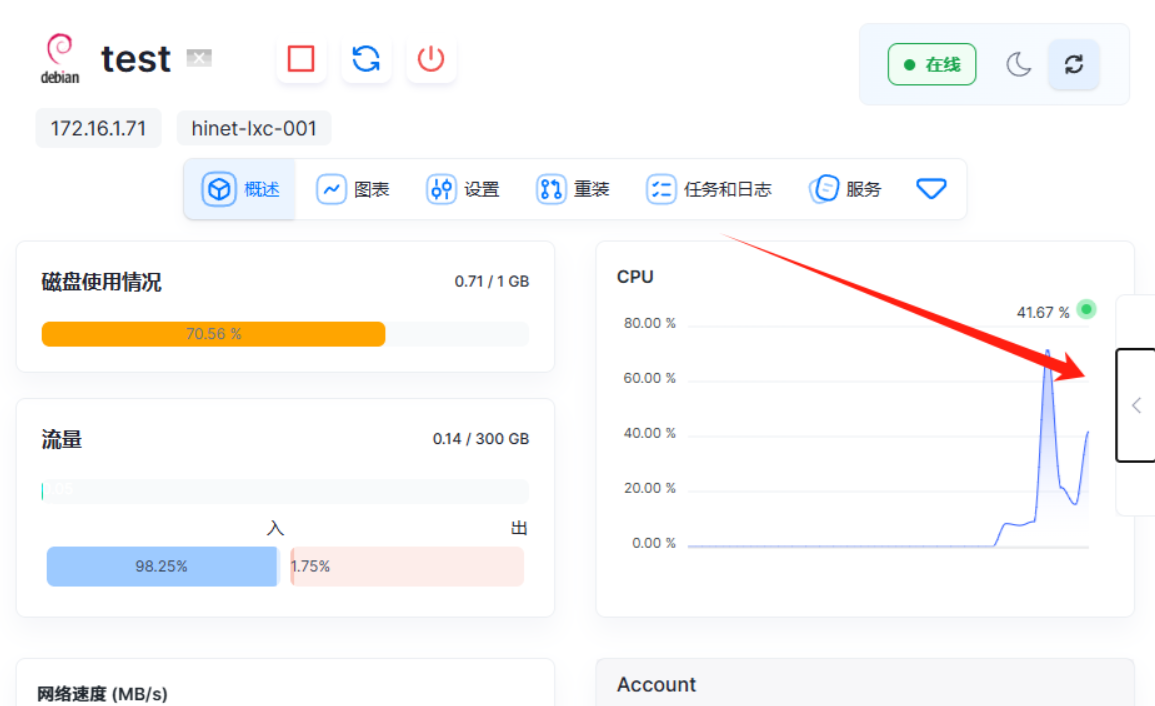
Step 1 after purchase: locate the internal IP to enable mapping. In the welcome email, NMcloud appended my internal IP 172.16.1.71 and SSH password.
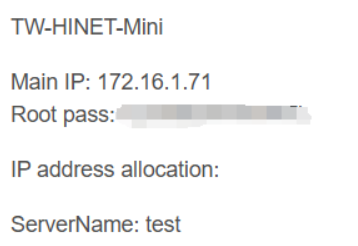
Step 2: find the public IP and mapping routine. Since the email lacked a public IP, we navigate directly into the product control panel.
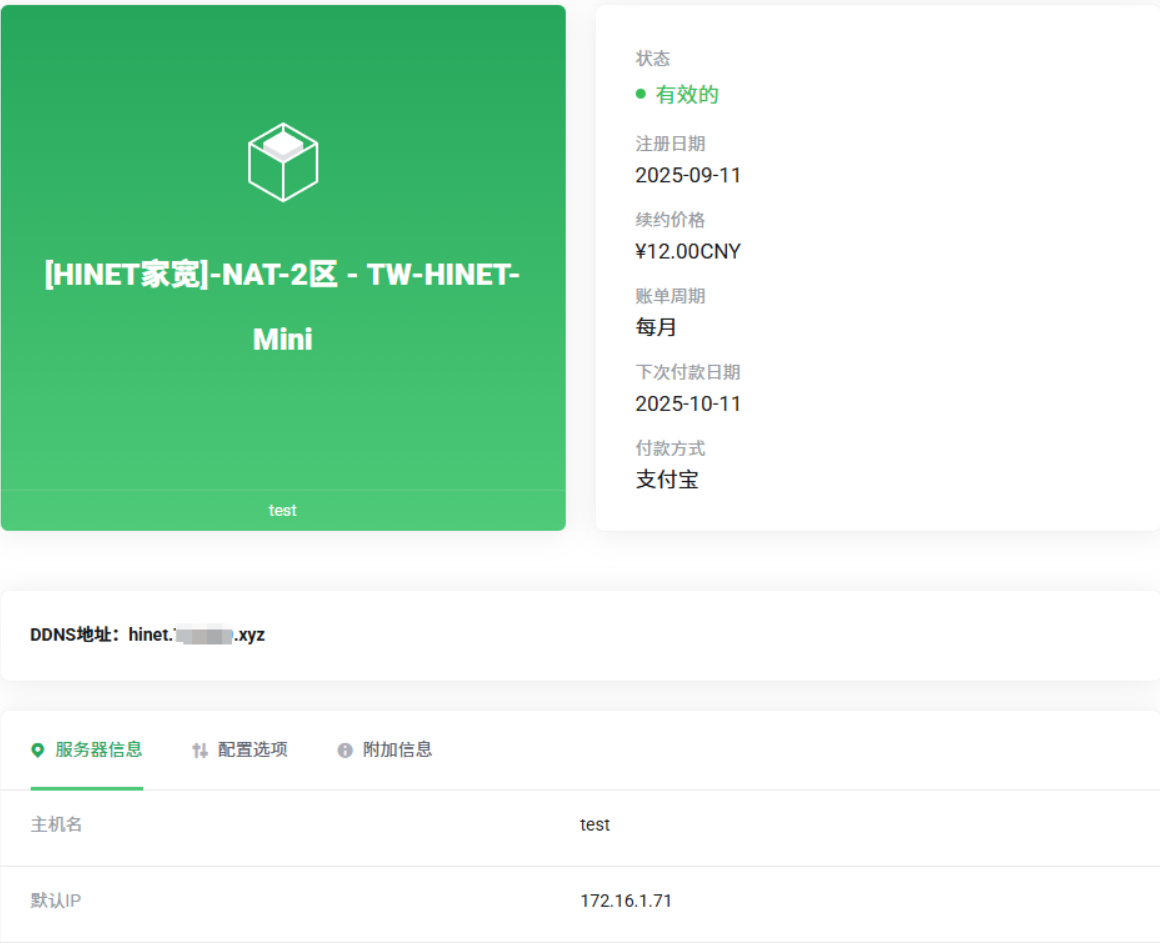
Look at the “DDNS” section on the lower left; that’s our public IP! Below it sits a default IP, representing our internal IP, matching the email.
Note: Some vendors display mismatched internal IPs across email and panel due to system glitch. Attempt mapping both if this arises.
Now equipped with public and internal parameters, locate the mapping module. Faced with unfamiliar dashboards, reading documentation or FAQs is the best bet – I found this in the Bulletin Center:
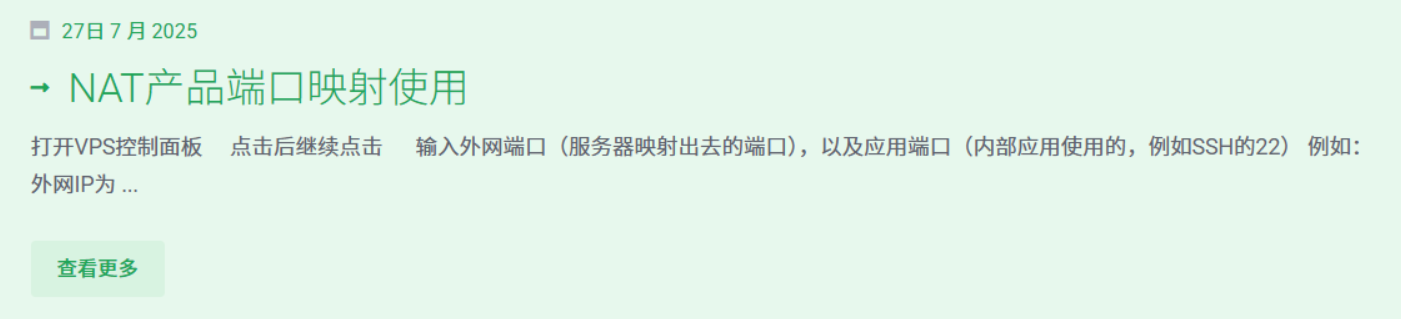
Clicking into it, it operates via manual mappings. Let’s follow the steps:
Click the right pop-up menu:
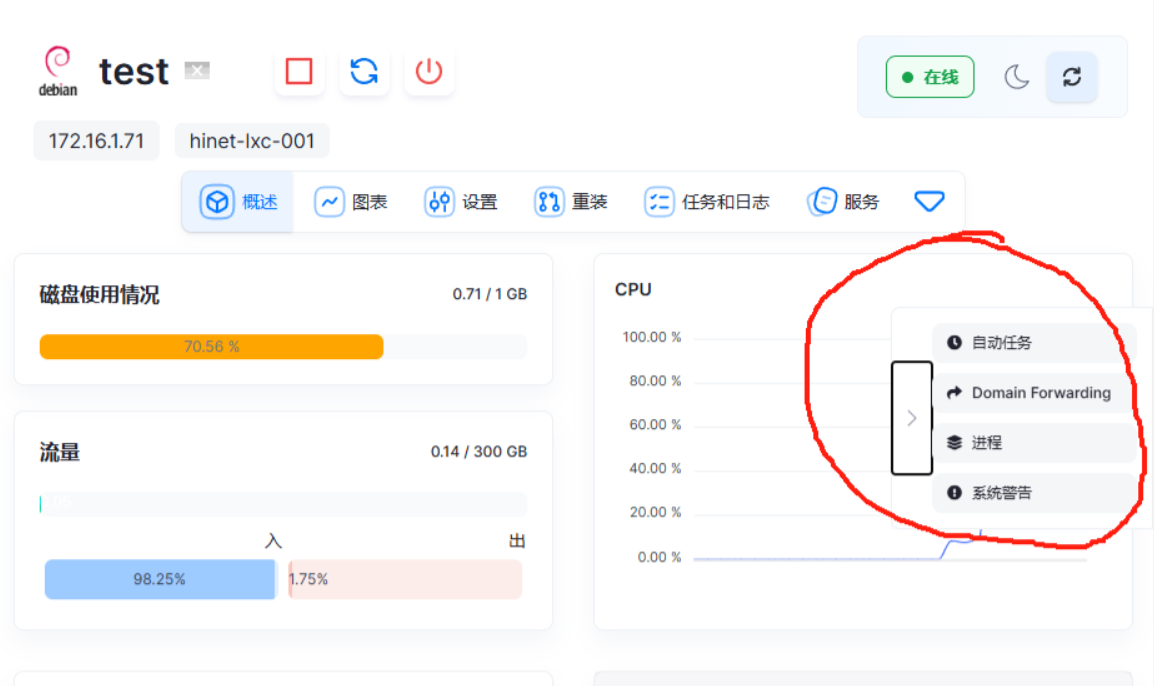
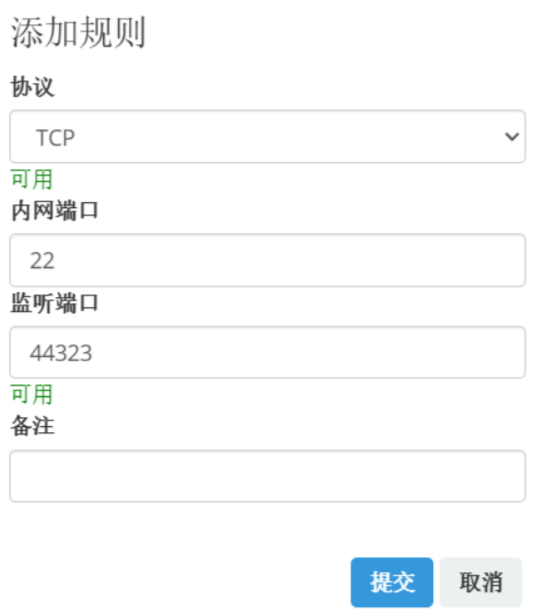
Click Domain Forwarding
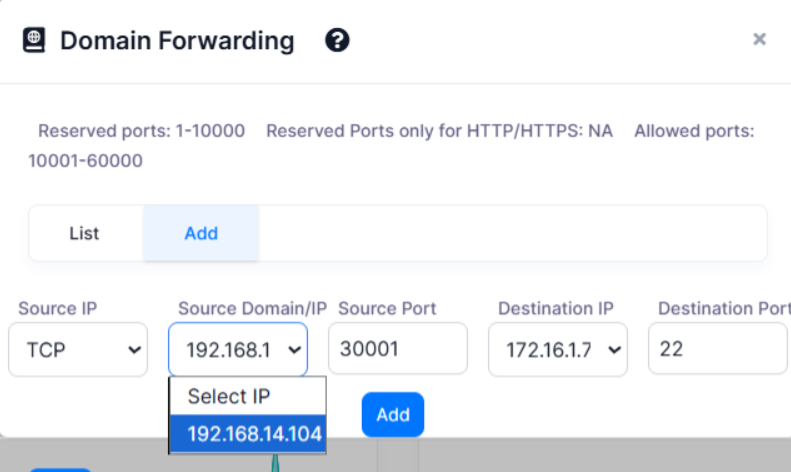
Click ADD, select TCP, and input your target port range. E.g., for an SSH port, map outer 30001 to inner 22. Click ADD, and you are done!
Note: Forwarding protocols default to TCP; some offer UDP/hybrid setups. If your app fails connecting, verify if it strictly requires UDP triggers. SSH isn’t strictly locked on 22; if customized, map outer ports onto your custom inner threshold.
|
|
ByteVirt
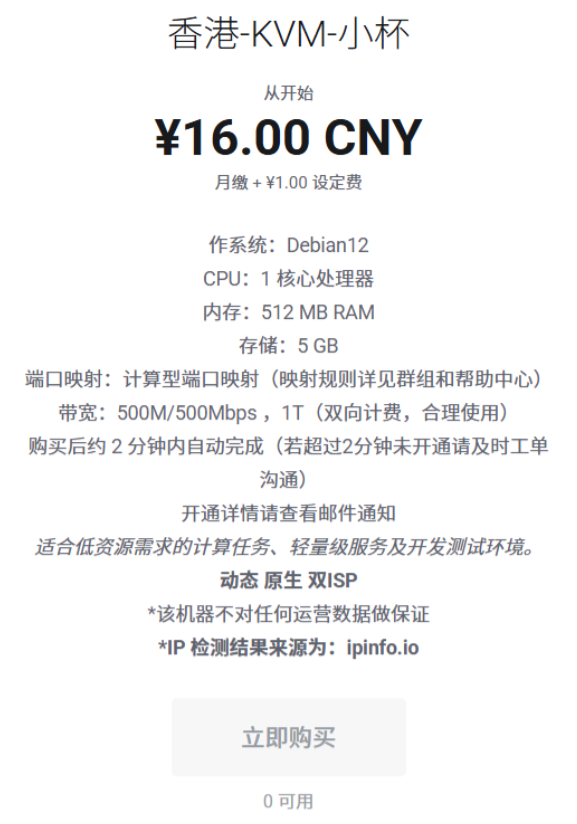
First, head to the purchase page:
Vendor policy: 20 IPv4 NAT Ports | 1 /64 or /80 IPv6 Addresses. This provides just 20 ports but allocates a dedicated IPv6, which you can utilize for absolute domains or IPv6 isolated workflows.
Step 1: locate the internal IP. Reviewing the welcome email, the vendor attached this:
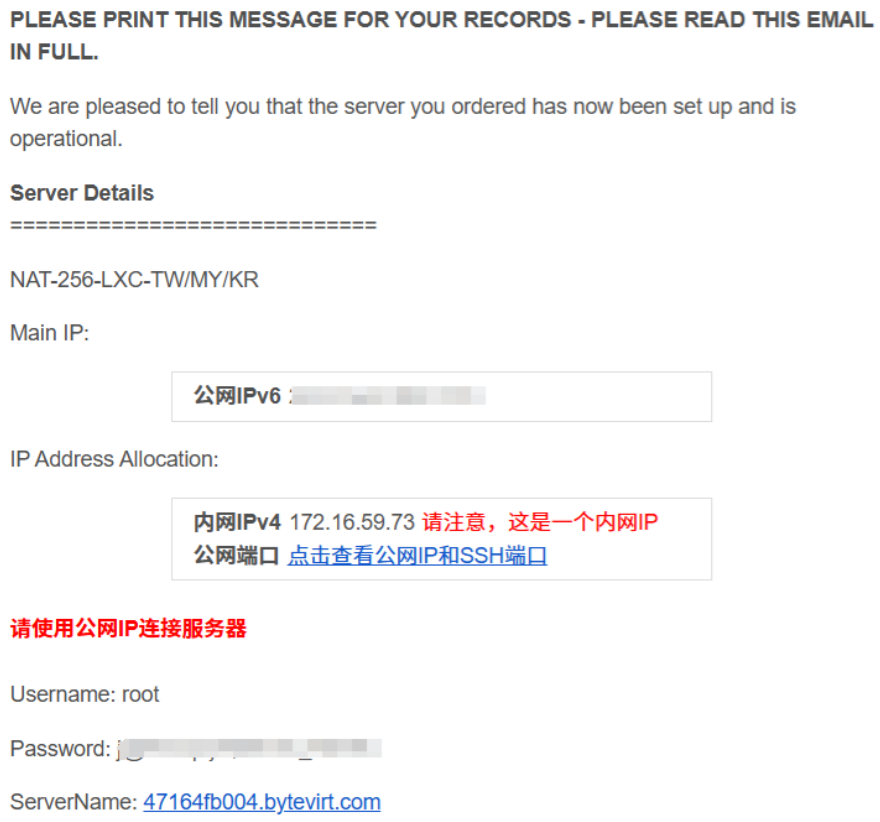
My internal IP is 172.16.59.73. Next, let’s find the public IP by clicking the link provided by the vendor:
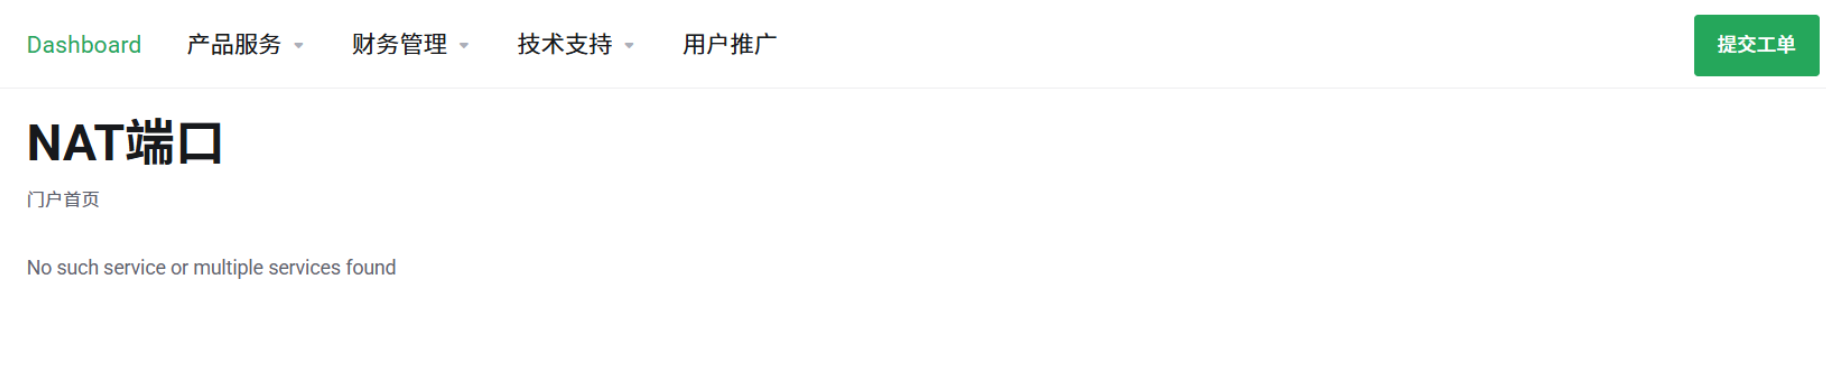
That’s embarrassing; it looks like an invalid page. No matter, let’s open the control panel instead.

We click to view the Public IPv4 details:

Wow! The vendor has already mapped it for us. The public IP is nattr7.bytevirt.net, mapping public 36001 to internal 22. Now we simply execute:
|
|
to log into the machine. Unlike nmcloud, these ports are rigidly static. To deploy services, you might need to adjust default ports (e.g., if a service expects 8080 but you only have 36001~36020, change the service configuration onto one of your allocated ranges).
SudaVPS
Similarly, head over to the purchase page:
Vendor policy: Calculative Port Mapping (refer to group or help center for rules). Simply put: ports are calculated algorithmically based on the internal IP. Let’s check the welcome email:
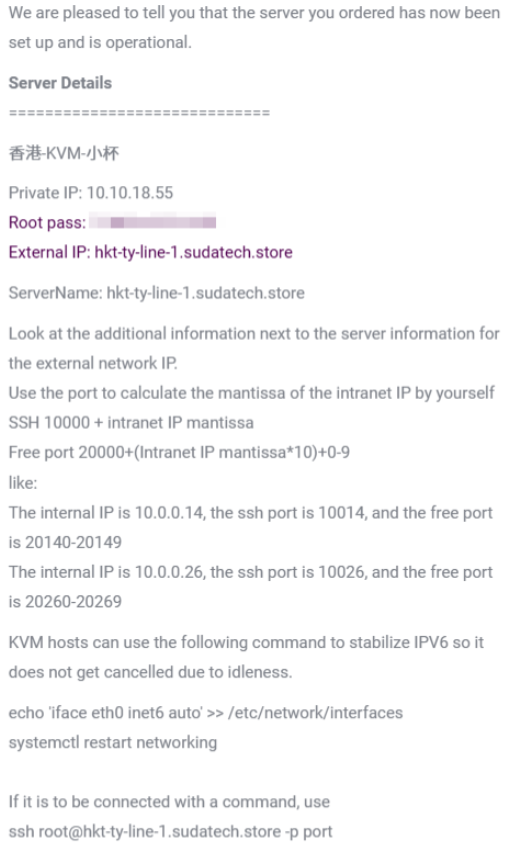
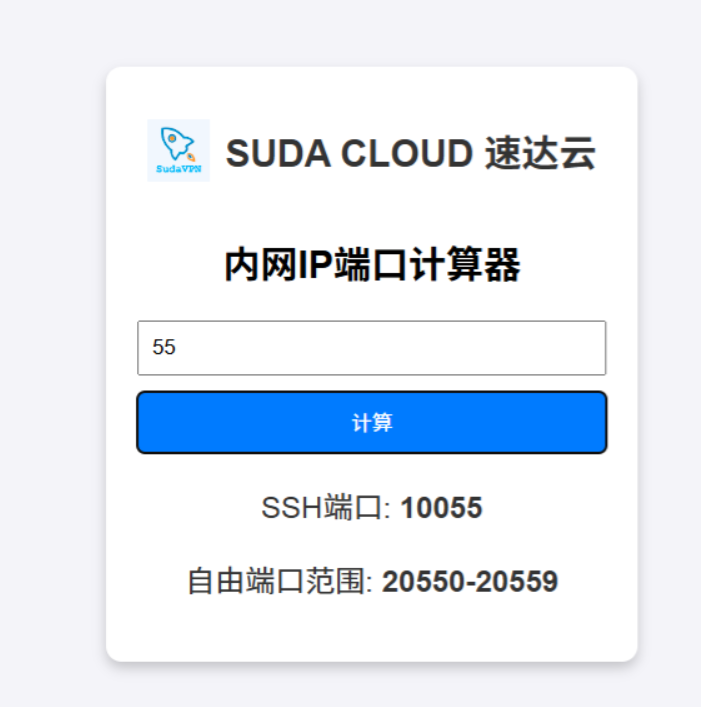
Internal IP reads 10.10.18.55 and Public IP hkt-ty-line-1.sudatech.store. The mapping rules are appended below:
|
|
Since our internal IP ends in .55, our SSH port calculation yields 10000+55 = 10055. The free ports calculate to 20000+55*10+[0~9], making it 20550 - 20559. We effectively get 10 free ports plus one dedicated SSH threshold.
|
|
Simply execute to log in! Of course, if you prefer avoiding math, vendors usually provide calculators on their website dashboard:
MiaoYun
Head over to the purchase page:
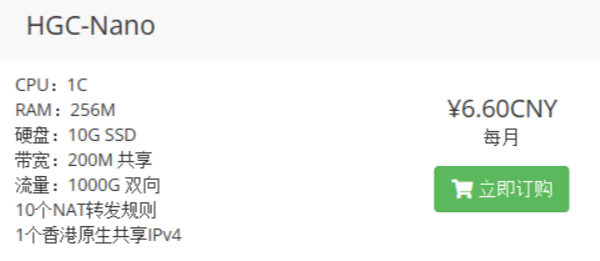
Vendor policy: 10 NAT Forwarding Rules (effectively 10 ports). Let’s review the welcome email:
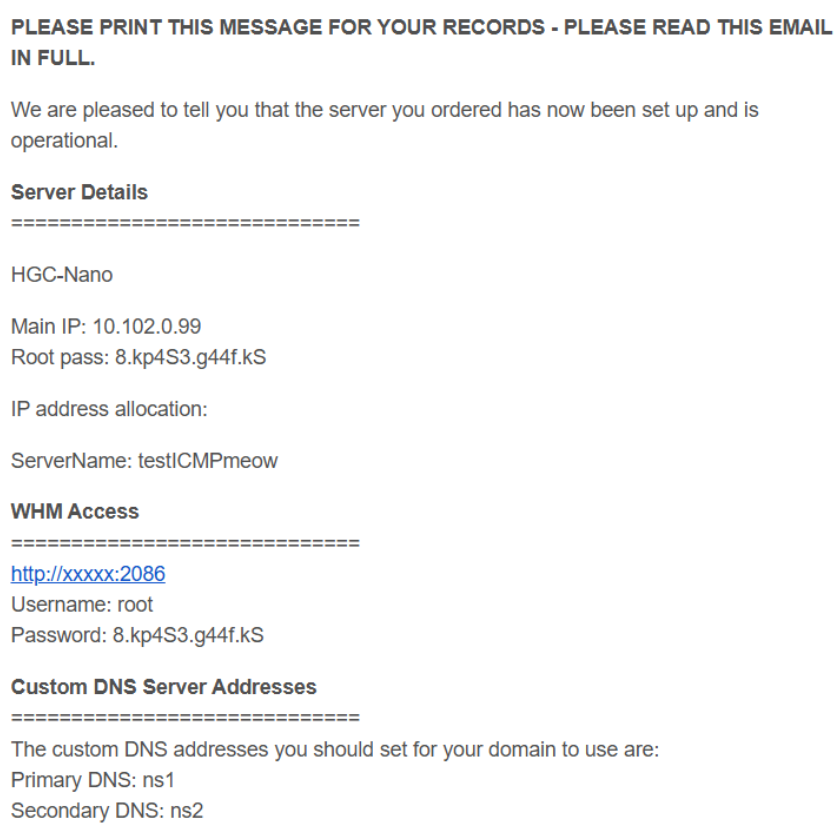
The internal IP reads 10.102.0.99. No mentions of mapping or public IPs exist here; let’s inspect the control panel instead:
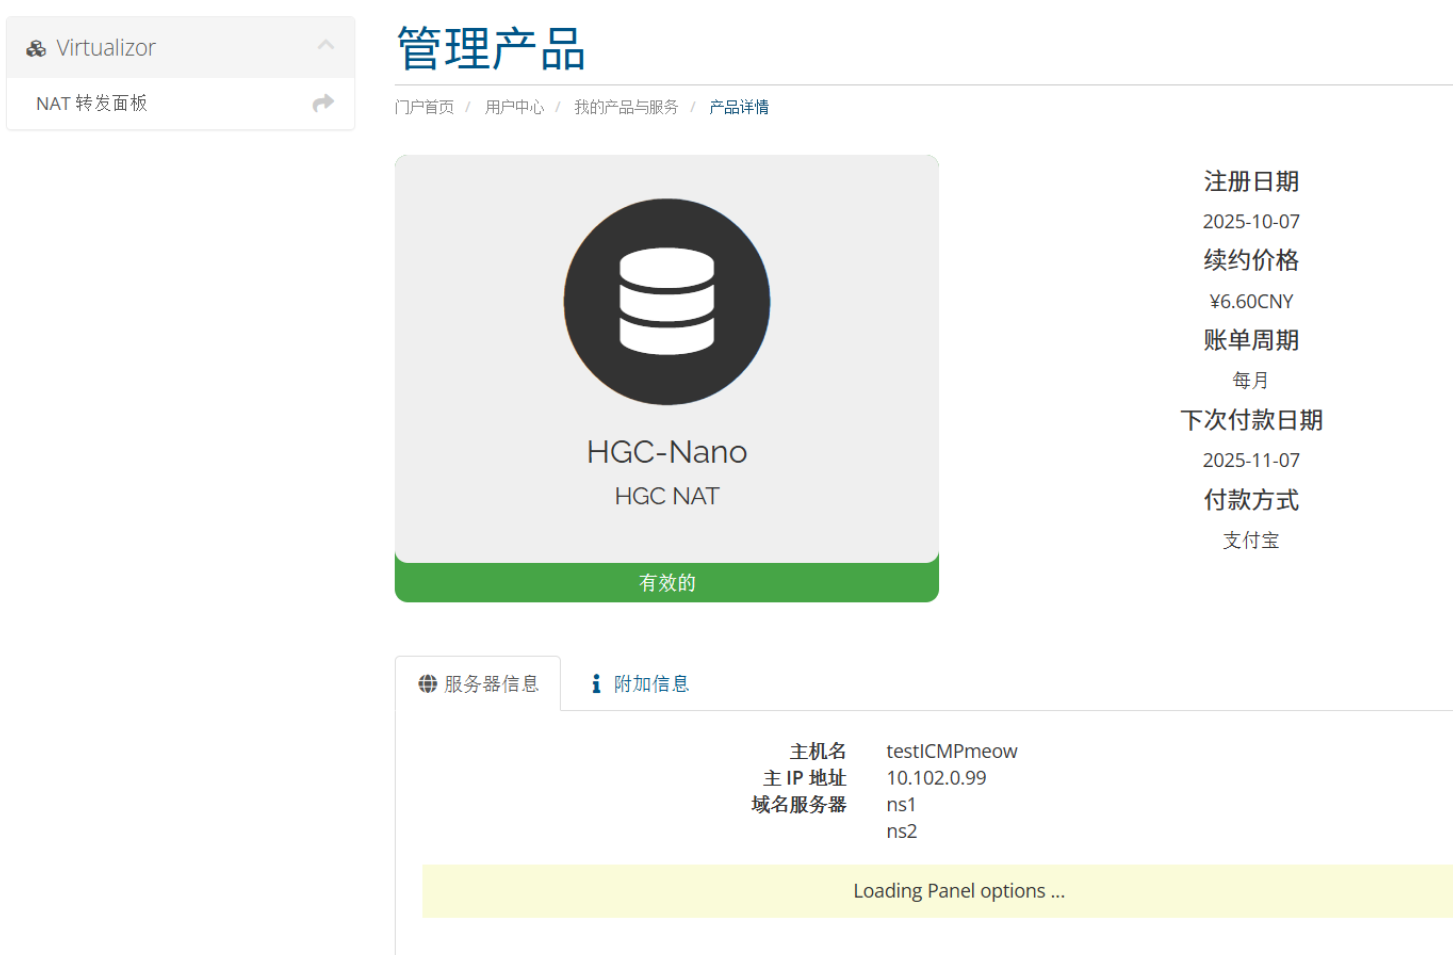
Look at the “Forwarding Panel” on the upper left; click into it:
The dashboard displays the public IP but provides no native DDNS. This implies if the IP rotates, you must manually sync updates on every cycle unless you deploy custom DDNS rules. Luckily, the vendor provides a guide; let’s see how mapping works:
We weren’t prompted for an internal IP address here, likely autofilled by the dashboard based on access scope. We can simply specify TCP mapping outer 44323 to inner 22 for SSH login.
|
|
Run that to log in! If required, deploy DDNS setups as dynamic IPs become quite bothersome over rotation.
4. References & Thoughts
Congratulations! Having read this far, you have fully mastered using NAT servers! 
NAT machines are extremely cheap, but I still recommend beginners invest in full IPv4 machines if budget allows. NAT setups involve quirks that might feel overwhelming. However, if you read this far, you are now officially NAT-qualified! Go exploring, young traveler—NAT is simple and extremely straightforward once you know the ropes.
FAQs
Q: Port mapped, but cannot connect?
- Verify protocol match (TCP/UDP)
- Verify service listens on
0.0.0.0 - Verify firewall rules permit the mapped port
- Verify if the public IP is blocked/GFWed
Q: Do internal and external ports need to match?
- Not strictly, but highly recommended
- Some applications hard-code ports; discrepancies crash configuration
Q: Can I map ports 80/443?
- Most NAT setups forbid mapping ports under 1024
- Hosting sites requires non-standard ports (e.g., 8080, 30002)
Q: What if the IP gets blocked/Gfwed?
- For shared IP exits: contact vendor to arrange rotation
- All users sharing that exit suffer identically
- NAT’s biggest risk: Incinerated borders due to reckless neighbors.
NAT servers are solid infrastructure when deployed in the right scenarios.