Preface#
Komari is a lightweight server status monitoring tool, commonly known as a “probe”. Main advantages include:
- Ultra-low system resource overhead
- Minimalistic deployment & maintenance experience
- Intuitive, beautiful Web dashboard
This article documents my process installing and configuring Komari via binaries on Debian and Alpine setups, serving as a quick reference guide.
Deploying Server (Master)#
The Komari server receives and stores all data reported from agent nodes. For stability and mesh compatibility, deploying on nodes natively supporting dual-stack (IPv4 + IPv6) is advisable .
This article utilizes a Netcup RS Piccolo ARMore instance for server deployment; it’s compact, powerful, cost-effective, and rare—one of my personal favorites~
Environment Preparation#
For security, the Komari server doesn’t require root privileges; creating a non-privileged user without login capability is best:
 1
 2
 3
 4
 5
 6
 7
 8
 9
10
11
12
13
14
15
16
17
|
# Update system packages

sudo apt update && sudo apt upgrade -y

# Create exclusive no-login user

sudo useradd -r -s /usr/sbin/nologin komari

# Create working & storage directory

sudo mkdir -p /opt/komari/server

# Configure file and directory privileges

sudo chown -R komari:komari /opt/komari/server

sudo chmod 750 /opt/komari/server
|
Fetching & Installing Server#
Download the latest executable binary corresponding to your server’s hardware architecture:
 1
 2
 3
 4
 5
 6
 7
 8
 9
10
11
12
13
14
15
16
17
18
19
|
# Current version: 1.1.8

# Architecture choices: komari-linux-amd64 | komari-linux-arm64

curl -L -o /tmp/komari-server https://github.com/komari-monitor/komari/releases/download/1.1.8/komari-linux-amd64

# GitHub Proxy download for pure IPv6 servers

curl -L -o /tmp/komari-server https://gh-proxy.com/https://github.com/komari-monitor/komari/releases/download/1.1.8/komari-linux-amd64

# Move to designated directory

sudo mv /tmp/komari-server /opt/komari/komari-server

# Set privileges

sudo chown root:root /opt/komari/komari-server

sudo chmod 755 /opt/komari/komari-server
|
Configuring Systemd Daemon#
Create and edit the service file /etc/systemd/system/komari.service:
 1
 2
 3
 4
 5
 6
 7
 8
 9
10
11
12
13
14
15
16
17
18
19
20
21
22
23
24
25
26
27
28
29
30
31
32
33
34
35
36
37
38
39
40
41
42
43
|
[Unit]

Description=Komari Monitor Server

After=network-online.target

Wants=network-online.target

[Service]

Type=simple

User=komari

Group=komari

WorkingDirectory=/opt/komari/server

ExecStart=/opt/komari/komari-server server -l 127.0.0.1:25774

Restart=always

RestartSec=5s

NoNewPrivileges=yes

ProtectSystem=strict

ProtectHome=yes

PrivateTmp=yes

ProtectKernelTunables=yes

ProtectControlGroups=yes

ReadWritePaths=/opt/komari/server

LimitNOFILE=65536

[Install]

WantedBy=multi-user.target
|
Starting & Verifying Service#
Reload the systemd daemon and start the Komari service:
 1
 2
 3
 4
 5
 6
 7
 8
 9
10
11
|
sudo systemctl daemon-reload

sudo systemctl enable --now komari

# Check service running status

sudo systemctl status komari

# First-run log reveals initial admin credentials

sudo journalctl -u komari -f
|
Reverse Proxy Setup (Nginx)#
Taking Nginx as an example, the reverse proxy configuration file is as follows:
 1
 2
 3
 4
 5
 6
 7
 8
 9
10
11
12
13
14
15
16
17
18
19
20
21
22
23
24
25
26
27
28
29
30
31
32
33
34
35
36
37
38
39
40
41
42
43
44
45
46
47
48
49
50
51
52
53
54
55
56
57
58
59
60
61
62
63
64
65
66
67
68
69
70
71
72
73
74
75
76
77
78
79
80
81
82
83
|
server {

    listen 80;

    listen [::]:80;

    server_name komari.your.domain;

    return 301 https://$host$request_uri;

}

server {

    listen 443 ssl;

    listen [::]:443 ssl;

    http2 on;

    server_name komari.your.domain;

    ssl_certificate     /etc/nginx/cert/komari.your.domain.pem;

    ssl_certificate_key /etc/nginx/cert/komari.your.domain.key;

    ssl_protocols TLSv1.2 TLSv1.3;

    ssl_ecdh_curve X25519:P-256:P-384;

    ssl_ciphers 'ECDHE-ECDSA-AES128-GCM-SHA256:ECDHE-ECDSA-CHACHA20-POLY1305:ECDHE-RSA-AES128-GCM-SHA256:ECDHE-RSA-CHACHA20-POLY1305:ECDHE+AES128:RSA+AES128:ECDHE+AES256:RSA+AES256';

    ssl_prefer_server_ciphers off;

    ssl_session_timeout 1d;

    ssl_session_cache shared:MozSSL:10m;

    add_header Strict-Transport-Security "max-age=31536000; includeSubDomains" always;

    access_log /var/log/nginx/komari.your.domain.access.log;

    error_log /var/log/nginx/komari.your.domain.error.log;

    add_header X-Frame-Options "SAMEORIGIN" always;

    add_header X-XSS-Protection "1; mode=block" always;

    add_header X-Content-Type-Options "nosniff" always;

    add_header Referrer-Policy "no-referrer-when-downgrade" always;

    add_header Content-Security-Policy "default-src 'self' http: https: data: blob: 'unsafe-inline' 'unsafe-eval' 'wasm-unsafe-eval'" always;

    location / {

        proxy_pass http://127.0.0.1:25774;

        proxy_set_header Host $host;

        proxy_set_header X-Forwarded-For   $proxy_add_x_forwarded_for;

        proxy_set_header X-Real-IP         $remote_addr;

        proxy_set_header X-Forwarded-Proto $scheme;

        proxy_http_version 1.1;

        proxy_set_header Upgrade $http_upgrade;

        proxy_set_header Connection "upgrade";

        proxy_buffering off;

        client_max_body_size 50M;

        proxy_read_timeout 86400;

        proxy_send_timeout 86400;

    }

}
|
Reload Nginx configuration:
1
|
sudo nginx -t && sudo nginx -s reload
|
Visit komari.your.domain and log in via the initial credentials nodes.
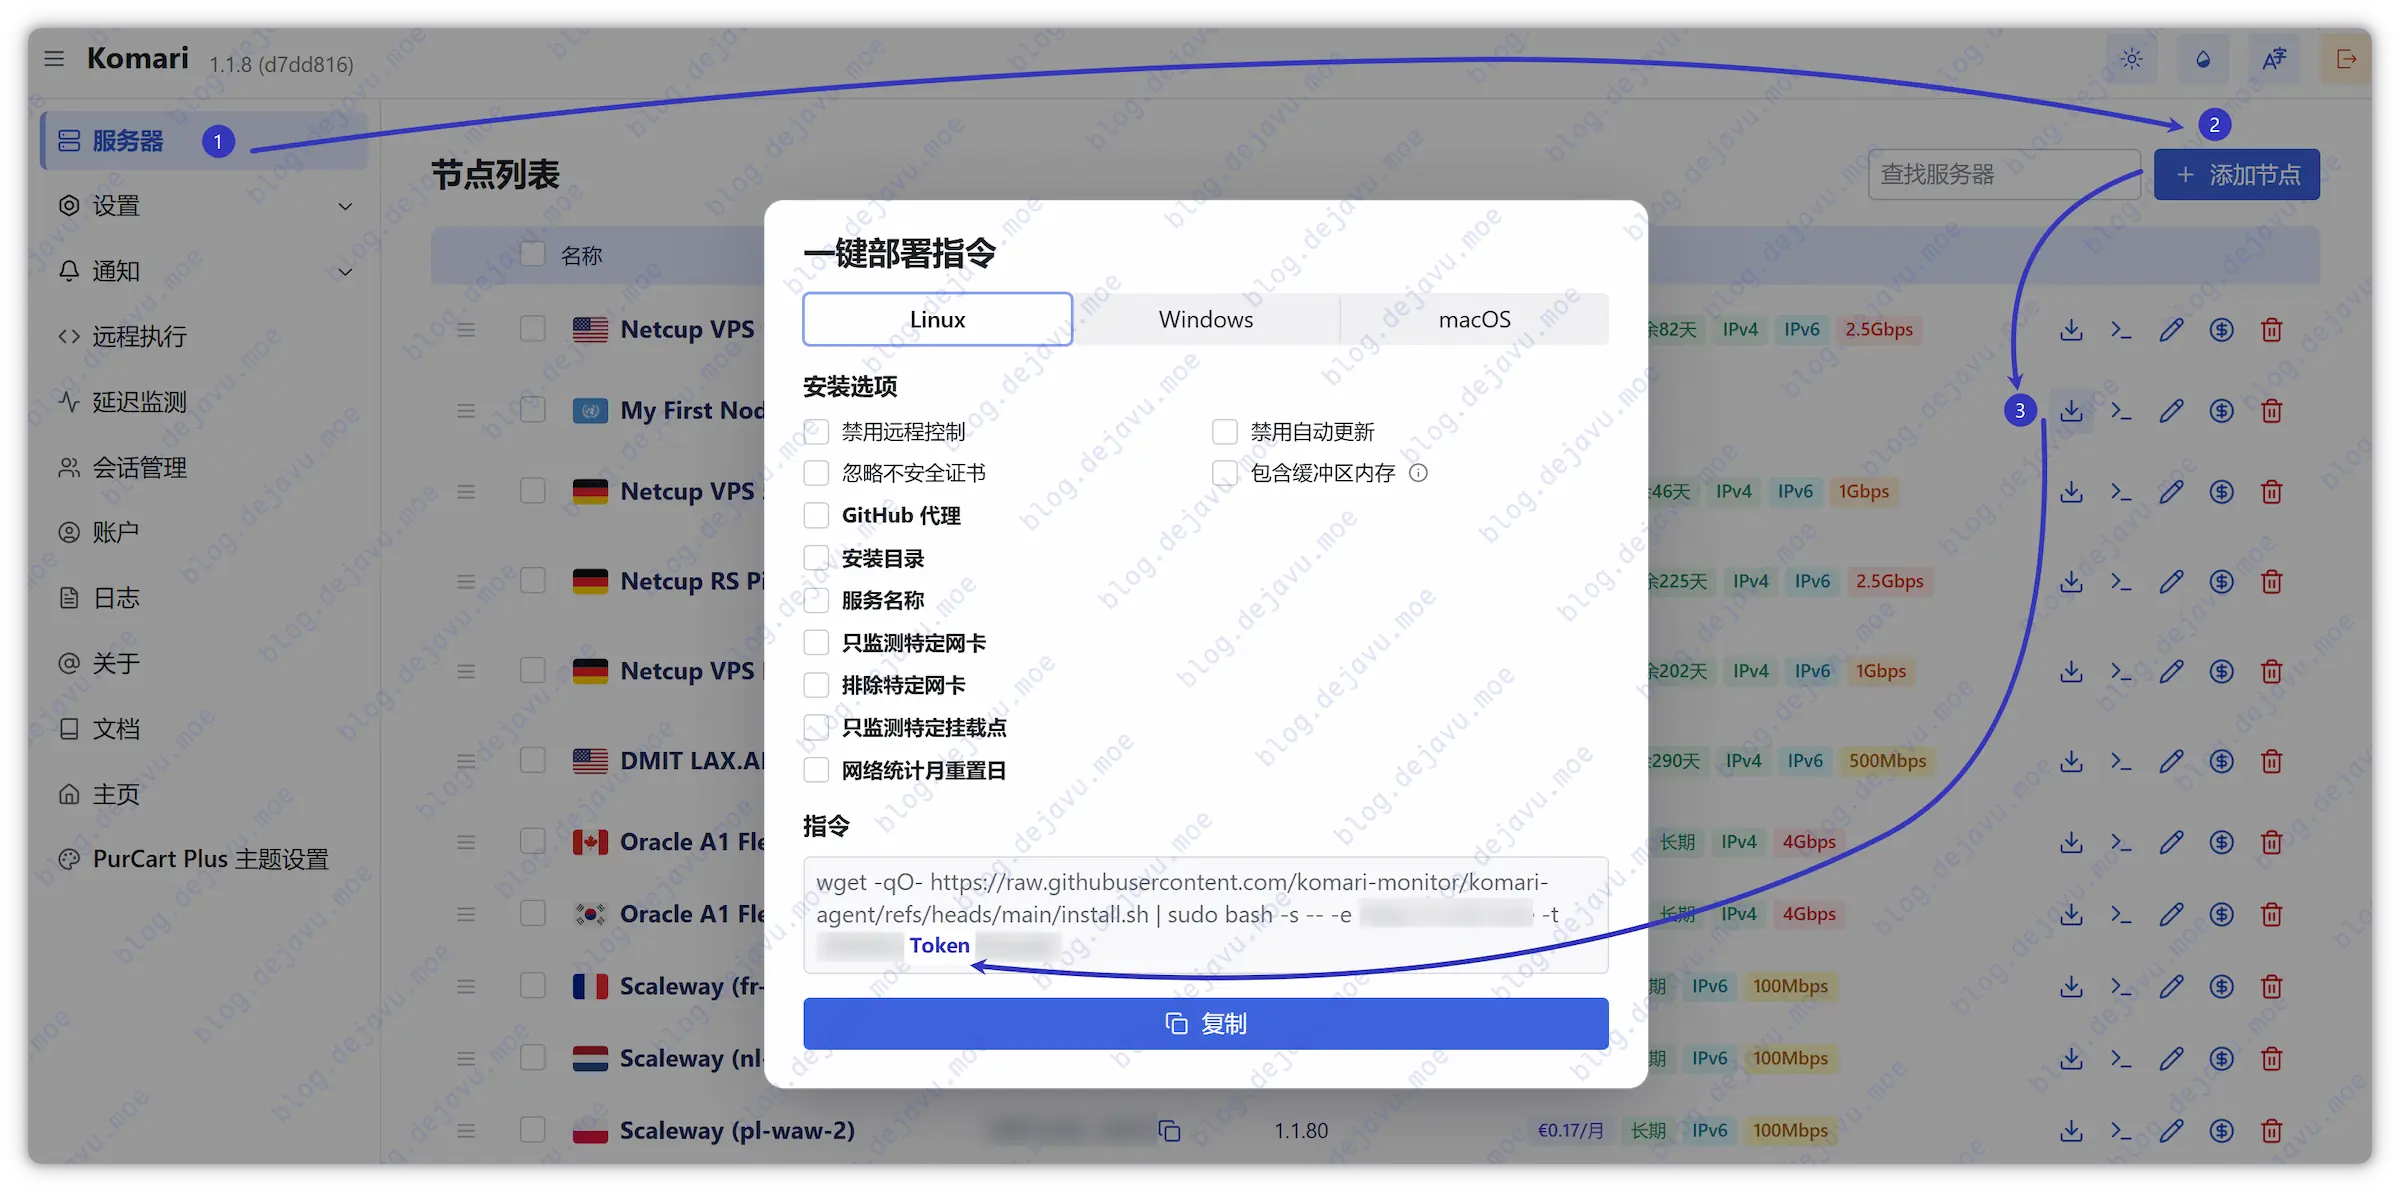
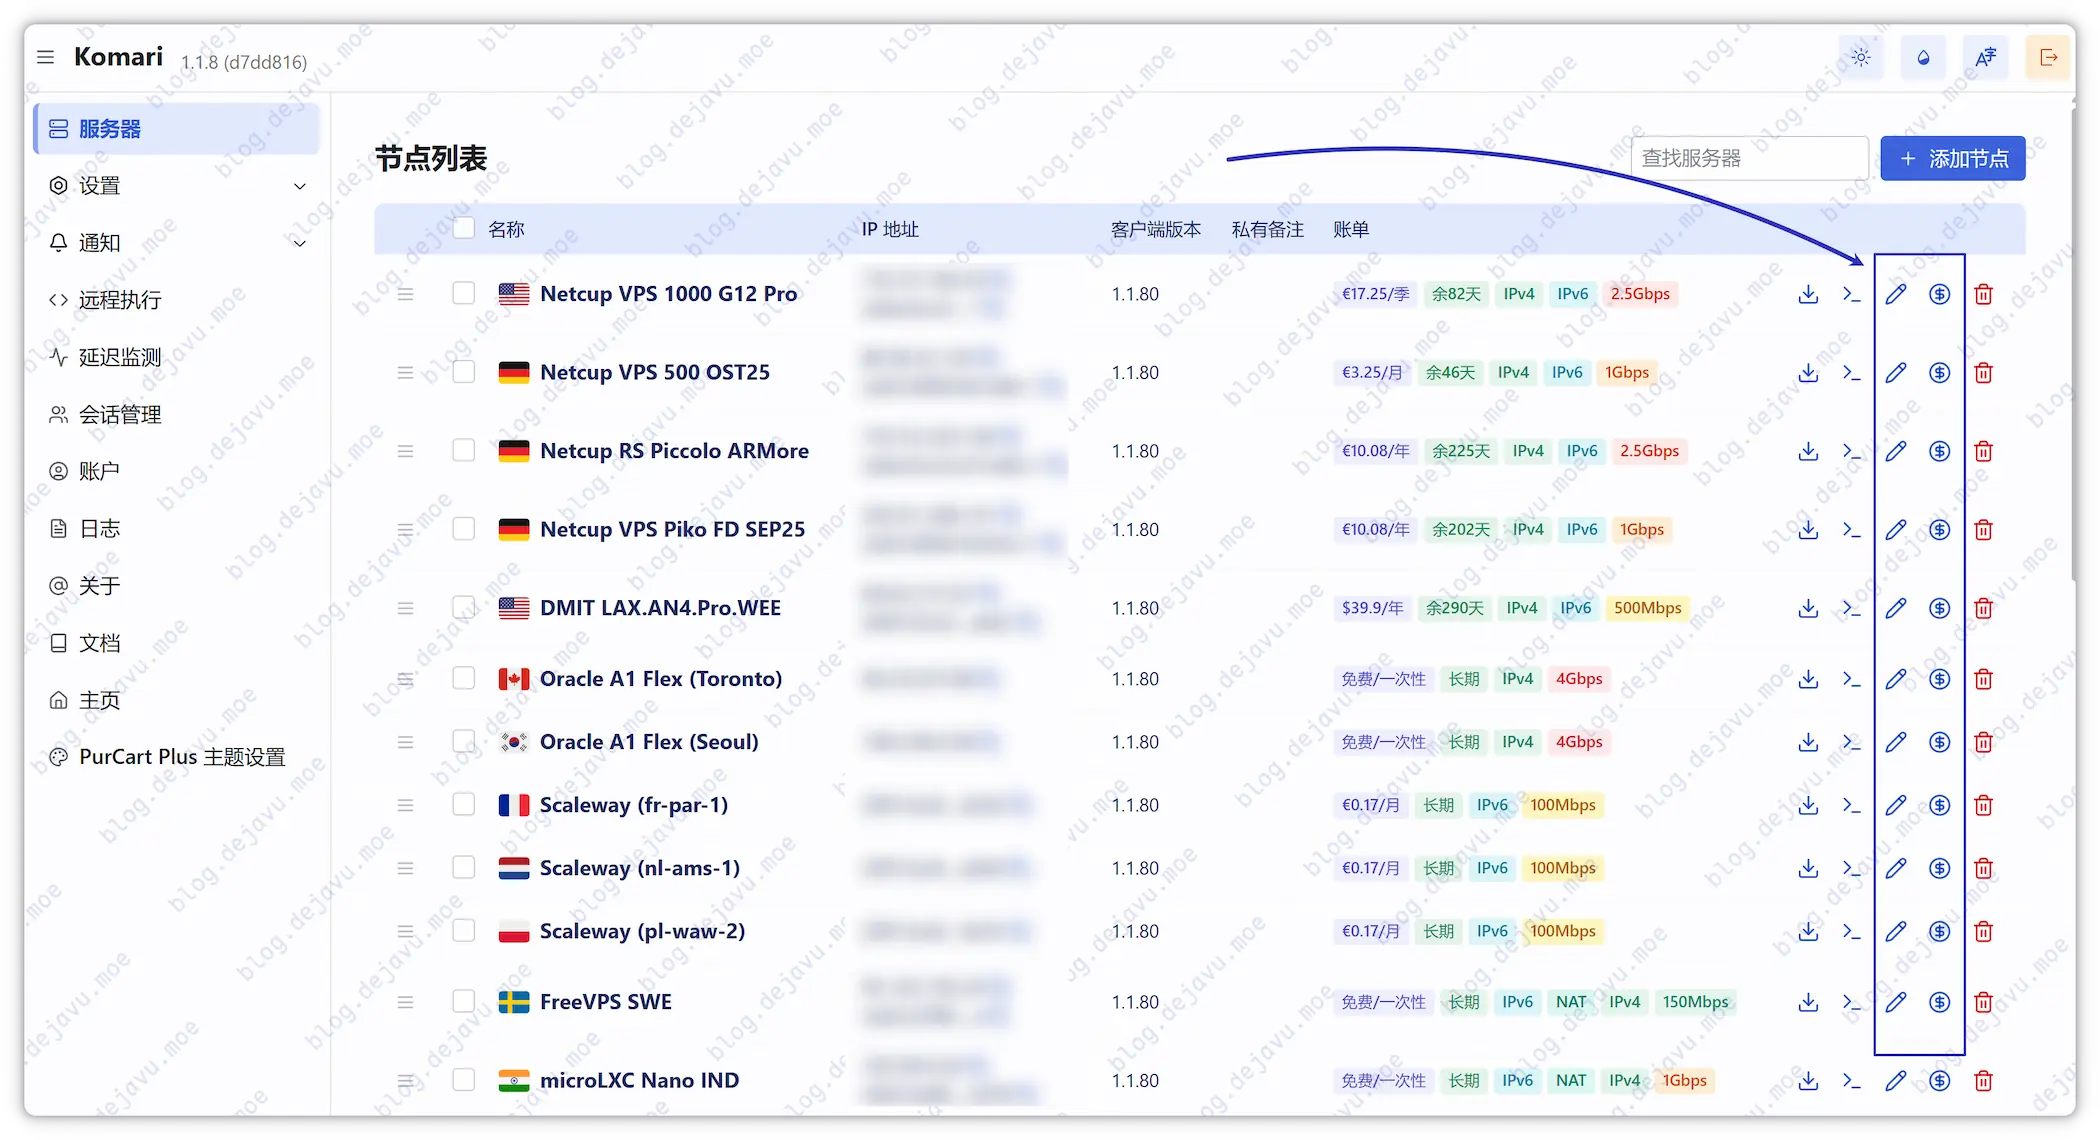
Adding Monitored Nodes (Agents)#
Now add your first server in the admin panel and copy the scoped Agent Token.
Upgrading Server#
If Komari releases a new version, upgrade the server program with the following steps:
 1
 2
 3
 4
 5
 6
 7
 8
 9
10
11
12
13
14
15
16
17
18
19
|
# Stop currently running Komari service

sudo systemctl stop komari

# Update binary file (replace version numbers and architecture yourself)

sudo curl -L -o /opt/komari/komari-server https://github.com/komari-monitor/komari/releases/download/<NEW_VERSION>/komari-linux-<ARCH>

# Set privileges

sudo chown root:root /opt/komari/komari-server

sudo chmod 755 /opt/komari/komari-server

# Restart service and check running status

sudo systemctl restart komari

sudo systemctl status komari
|
Deploying Agent on General Linux#
Debian GNU/Linux manages daemons via Systemd, which is the standard practice across the vast majority of mainstream Linux distributions.
Fetching & Installing Agent#
Prepare Agent working directory:
1
|
sudo mkdir -p /opt/komari/agent
|
Download the corresponding Agent binary based on server architecture:
1
2
3
4
5
|
# Current version: 1.1.80

# Architecture choices: komari-agent-linux-amd64 | komari-agent-linux-arm64

sudo curl -L -o /opt/komari/komari-agent https://github.com/komari-monitor/komari-agent/releases/download/1.1.80/komari-agent-linux-amd64
|
Set correct privileges:
1
2
3
|
sudo chown root:root /opt/komari/komari-agent

sudo chmod +x /opt/komari/komari-agent
|
Configuring Systemd Daemon#
Edit the /etc/systemd/system/komari-agent.service service configuration file:
 1
 2
 3
 4
 5
 6
 7
 8
 9
10
11
12
13
14
15
16
17
18
19
20
21
22
23
24
25
26
27
28
29
30
31
32
33
|
[Unit]

Description=Komari Agent Service

After=network-online.target

Wants=network-online.target

[Service]

Type=simple

User=root

Group=root

# Replace URL and <token> with actual panel data

# If Agent and server share the same machine, URL can simply fit http://127.0.0.1:25774

ExecStart=/opt/komari/komari-agent -e https://komari.your.domain -t <token> --disable-web-ssh --disable-auto-update --month-rotate 1

WorkingDirectory=/opt/komari/agent

Restart=always

RestartSec=10s

LimitNOFILE=65536

[Install]

WantedBy=multi-user.target
|
Reload Systemd config and start the Komari Agent service:
1
2
3
|
sudo systemctl daemon-reload

sudo systemctl enable --now komari-agent
|
Check the service status and real-time logs to confirm successful connection to the panel:
1
2
3
|
sudo systemctl status komari-agent

sudo journalctl -u komari-agent -f
|
Upgrading Agent Service#
Whenever you need to update the Agent program thereafter, follow these steps:
 1
 2
 3
 4
 5
 6
 7
 8
 9
10
11
12
13
14
15
16
17
18
19
|
# Stop currently running Agent service

sudo systemctl stop komari-agent

# Update binary file (replace version numbers and architecture yourself)

sudo curl -L -o /opt/komari/komari-agent https://github.com/komari-monitor/komari-agent/releases/download/<NEW_VERSION>/komari-agent-linux-<ARCH>

# Re-assign execution privileges

sudo chown root:root /opt/komari/komari-agent

sudo chmod +x /opt/komari/komari-agent

# Restart service and check running status

sudo systemctl restart komari-agent

sudo systemctl status komari-agent
|
Deploying Agent via PaaS / Docker#
For PaaS platforms supporting Docker container deployments, you can run the Agent directly using the official image:
 1
 2
 3
 4
 5
 6
 7
 8
 9
10
11
|
# Specify public container image

ghcr.io/komari-monitor/komari-agent:1.1.41

# Override default startup command

/bin/sh -c

# Set deployment parameters (replace URL and Token)

/app/komari-agent -e https://komari.your.domain -t <token> --disable-web-ssh --disable-auto-update --month-rotate 1
|
To upgrade Agent versions afterwards, simply modify the image’s version tag and redeploy.
Deploying Agent on Alpine Linux#
Alpine is a lightweight Linux distro relying on Busybox with OpenRC Init systems managing daemons instead of standard Systemd.
Many providers offering ultra-small RAM LXC containers usually pre-install Alpine. Due to its minimal resource footprint, 64MB RAM suffices to run Komari Agent smoothly.
Configuring Swap (Optional)#
Furthermore, if utilizing KVM architecture with extremely small RAM (e.g., 64MB) Alpine instances, configuring Swap virtual memory is advised. Otherwise, operations like package manager updates can easily trigger OOM, killing memory-bound processes.
For LXC containers sharing host kernels, this step is typically unnecessary.
 1
 2
 3
 4
 5
 6
 7
 8
 9
10
11
12
13
14
15
16
17
18
19
20
21
22
23
24
25
26
27
28
29
30
31
32
33
|
# Create 512MB virtual memory file

dd if=/dev/zero of=/swapfile bs=1M count=512

# Set secure privileges

chmod 600 /swapfile

# Format and enable Swap

mkswap /swapfile

swapon /swapfile

# Write to fstab for automatic mount on boot

echo "/swapfile none swap sw 0 0" >> /etc/fstab

# Add swap mount service to boot start services

rc-update add swap boot

# Verify Swap is active

free -m

# (Fallback) If apk process previously froze due to insufficient RAM

# Execute the following command to clean lock files

killall apk 2>/dev/null

rm -f /lib/apk/db/lock
|
Prepare Environment#
1
2
3
4
5
|
apk update && apk add curl vim

# Prepare working directory

mkdir -p /opt/komari/agent
|
Installing Agent#
Download the Agent binary corresponding to the VPS architecture and grant executable privileges:
1
2
3
4
5
6
7
|
curl -L -o /opt/komari/komari-agent https://github.com/komari-monitor/komari-agent/releases/download/1.1.80/komari-agent-linux-amd64

# Set privileges

chown root:root /opt/komari/komari-agent

chmod +x /opt/komari/komari-agent
|
Configuring OpenRC Daemon#
On Alpine, write OpenRC init scripts to manage daemons:
1
|
vim /etc/init.d/komari-agent
|
Insert the following configuration:
 1
 2
 3
 4
 5
 6
 7
 8
 9
10
11
12
13
14
15
16
17
18
19
20
21
22
23
24
25
26
27
28
29
30
31
|
#!/sbin/openrc-run

name="Komari Agent"

description="Komari Agent Service"

command="/opt/komari/komari-agent"

# Replace hostname and Token

command_args="-e https://komari.your.domain -t <token> --disable-web-ssh --disable-auto-update --month-rotate 1"

command_background="yes"

pidfile="/run/${RC_SVCNAME}.pid"

directory="/opt/komari/agent"

rc_ulimit="-n 65536"

output_log="/var/log/komari-agent.log"

error_log="/var/log/komari-agent.log"

depend() {

    need net

    after firewall

}
|
Grant executable permissions to the script:
1
|
chmod +x /etc/init.d/komari-agent
|
Start the service:
1
2
3
4
5
6
7
|
# Set enable on boot

rc-update add komari-agent default

# Start service

rc-service komari-agent start
|
Check status and inspect logs:
1
2
3
4
5
6
7
|
# View service status

rc-service komari-agent status

# View running logs

tail -f /var/log/komari-agent.log
|
Upgrading Agent Service#
Whenever you need to upgrade Agent versions under Alpine environment thereafter:
 1
 2
 3
 4
 5
 6
 7
 8
 9
10
11
12
13
14
15
16
17
18
19
|
# Stop komari agent service

rc-service komari-agent stop

# Update binary file

curl -L -o /opt/komari/komari-agent https://github.com/komari-monitor/komari-agent/releases/download/<NEW_VERSION>/komari-agent-linux-<ARCH>

# Re-assign privileges

chown root:root /opt/komari/komari-agent

chmod +x /opt/komari/komari-agent

# Restart service and check status

rc-service komari-agent restart

rc-service komari-agent status
|
Post Configurations#
Following the first node’s addition, subsequent server attachments follow identical routines. Next, we will briefly finalize common configuration nodes.
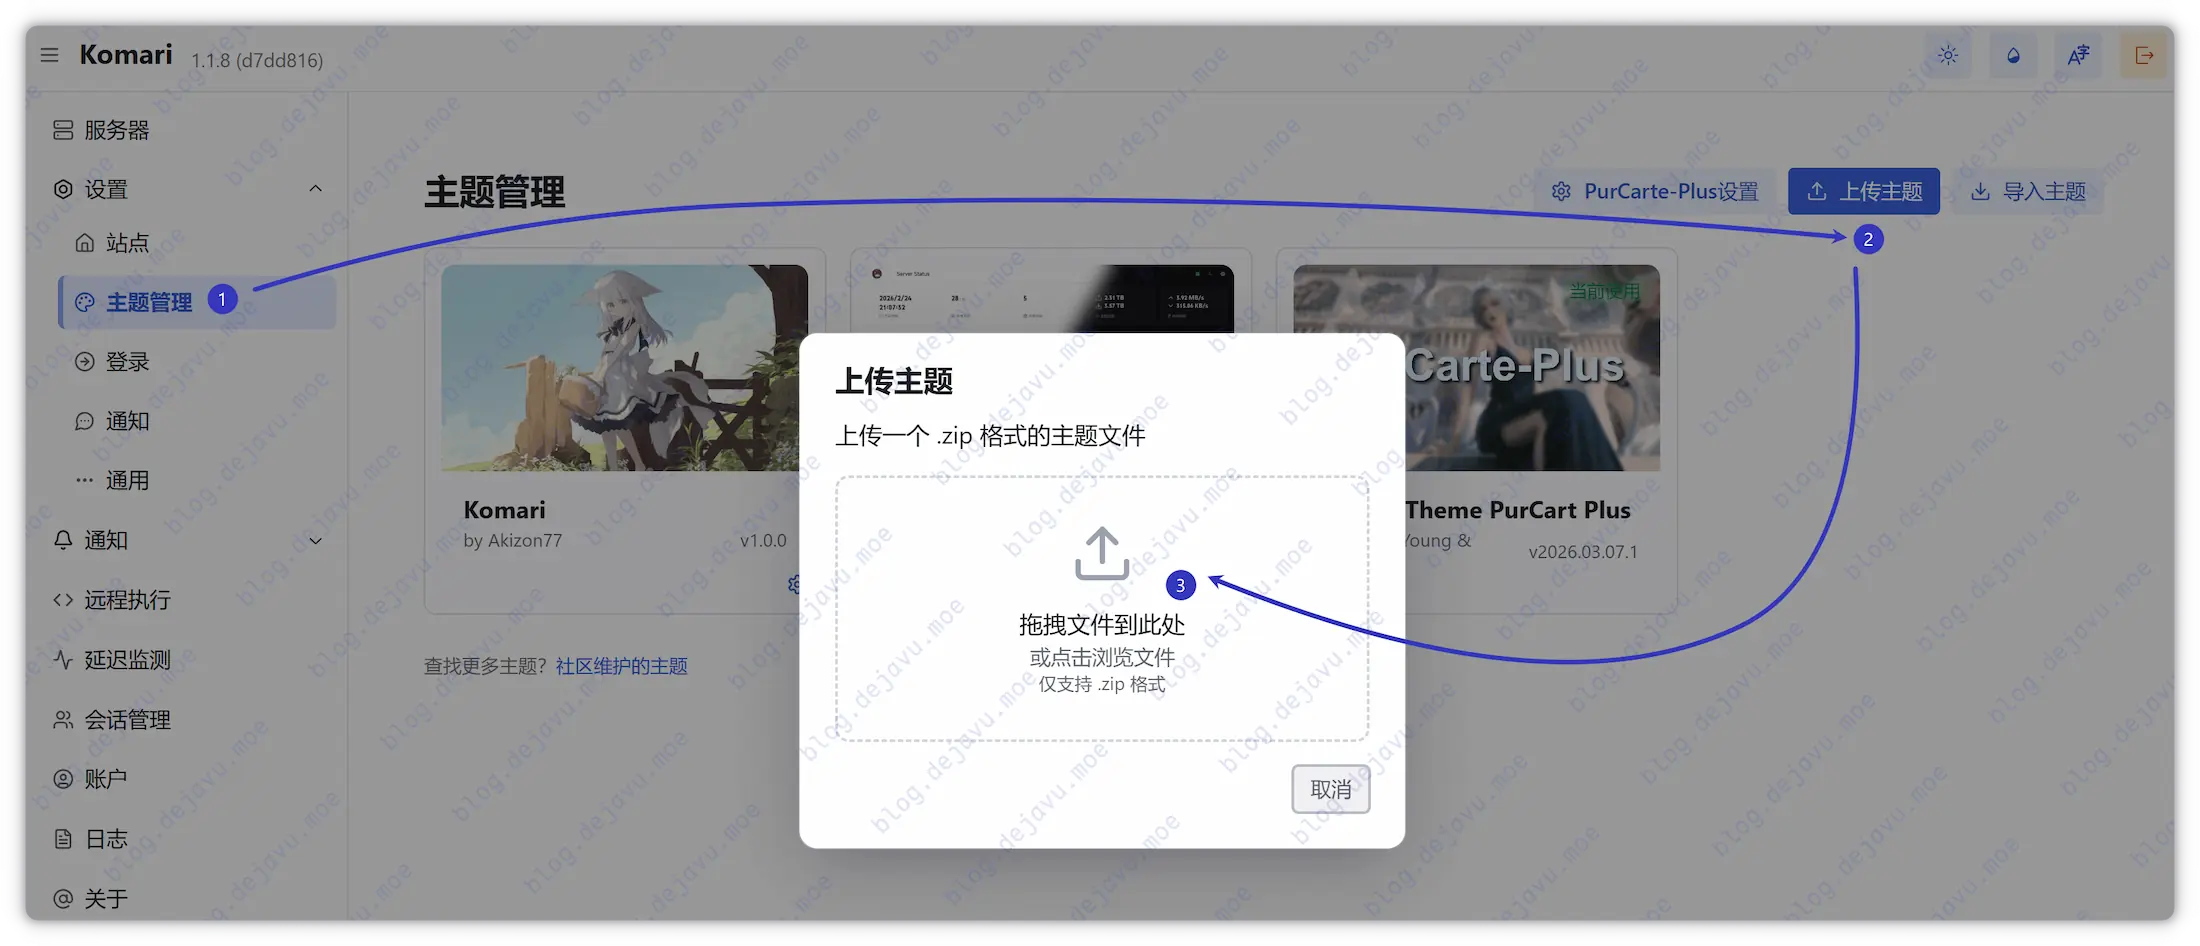
Installing Themes#
Komari’s default theme is already visually refined. If you desire alternatives, head to Community Themes, download themes, upload .zip packs directly in the admin panel dashboard, and activate.
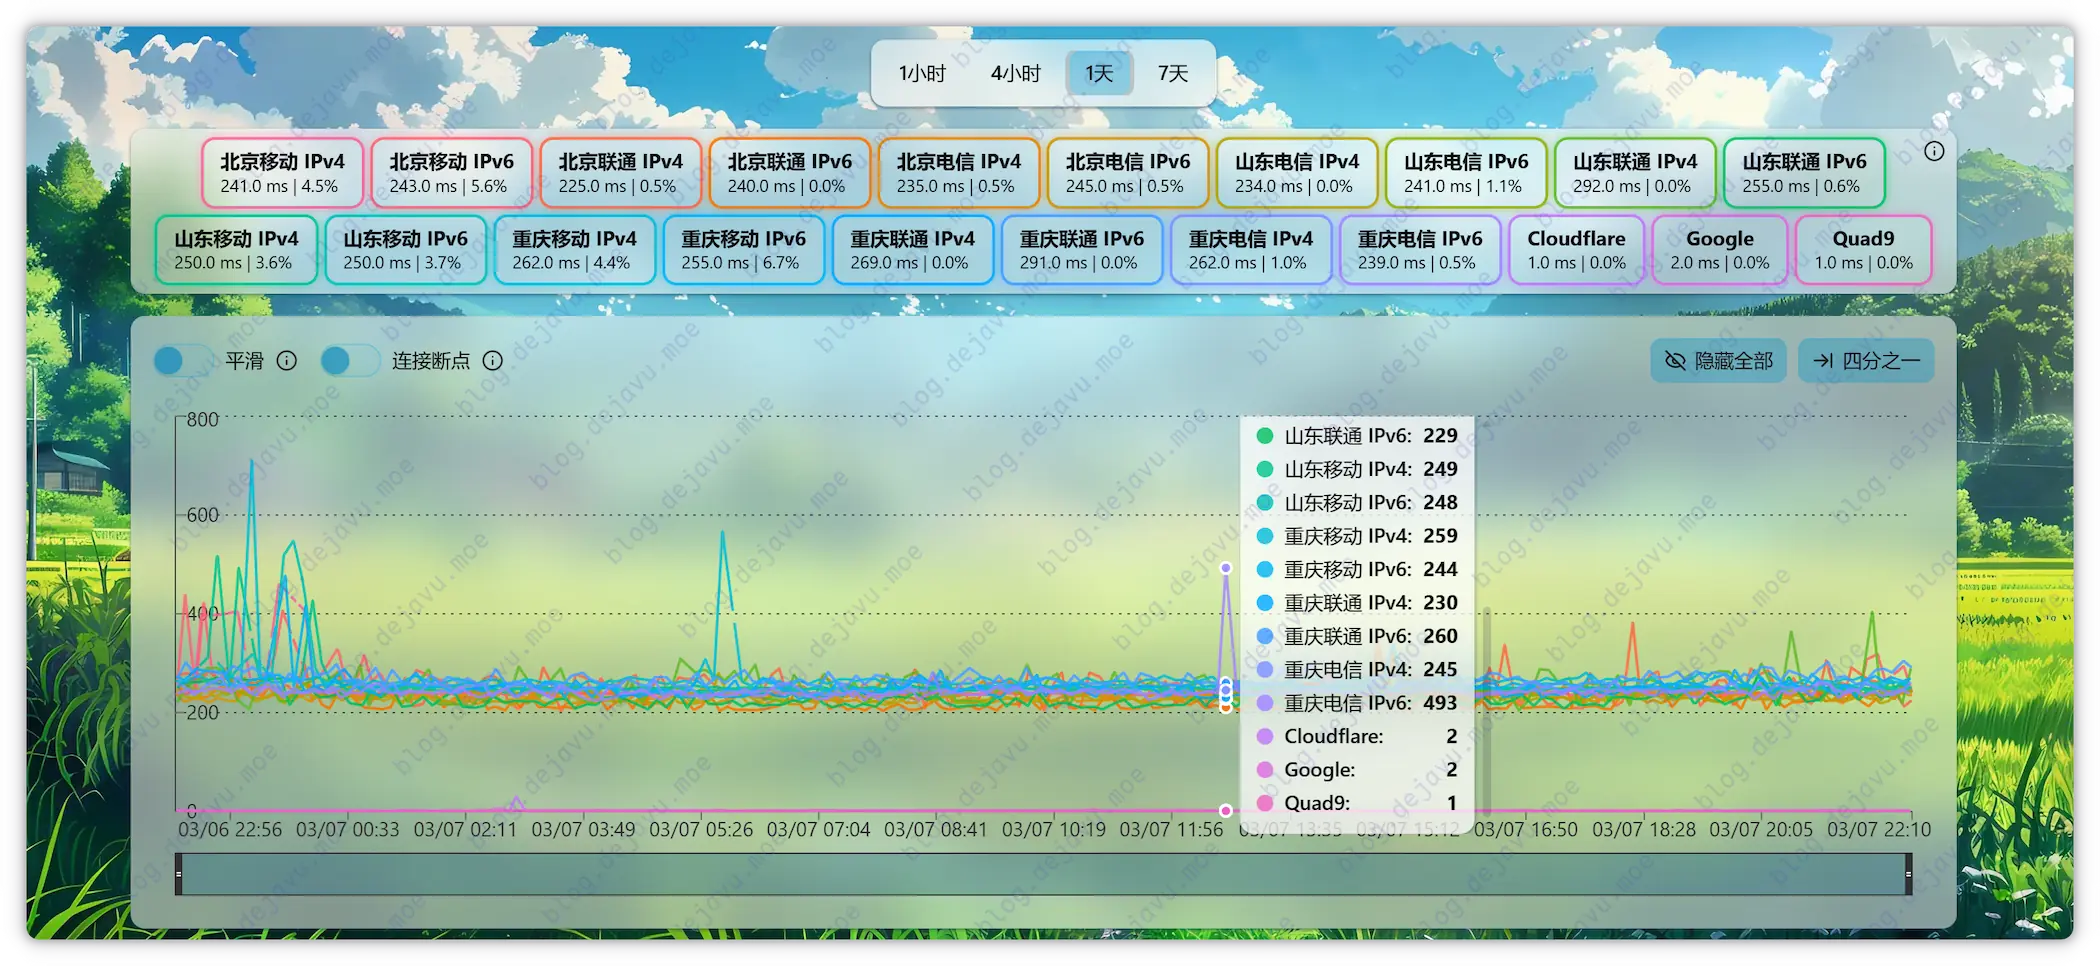
Configuring Ping Targets#
Komari natively supports latency monitoring across ICMP, TCP, and HTTP. For Chinese mainland testing nodes, metadata can be sourced on this page.
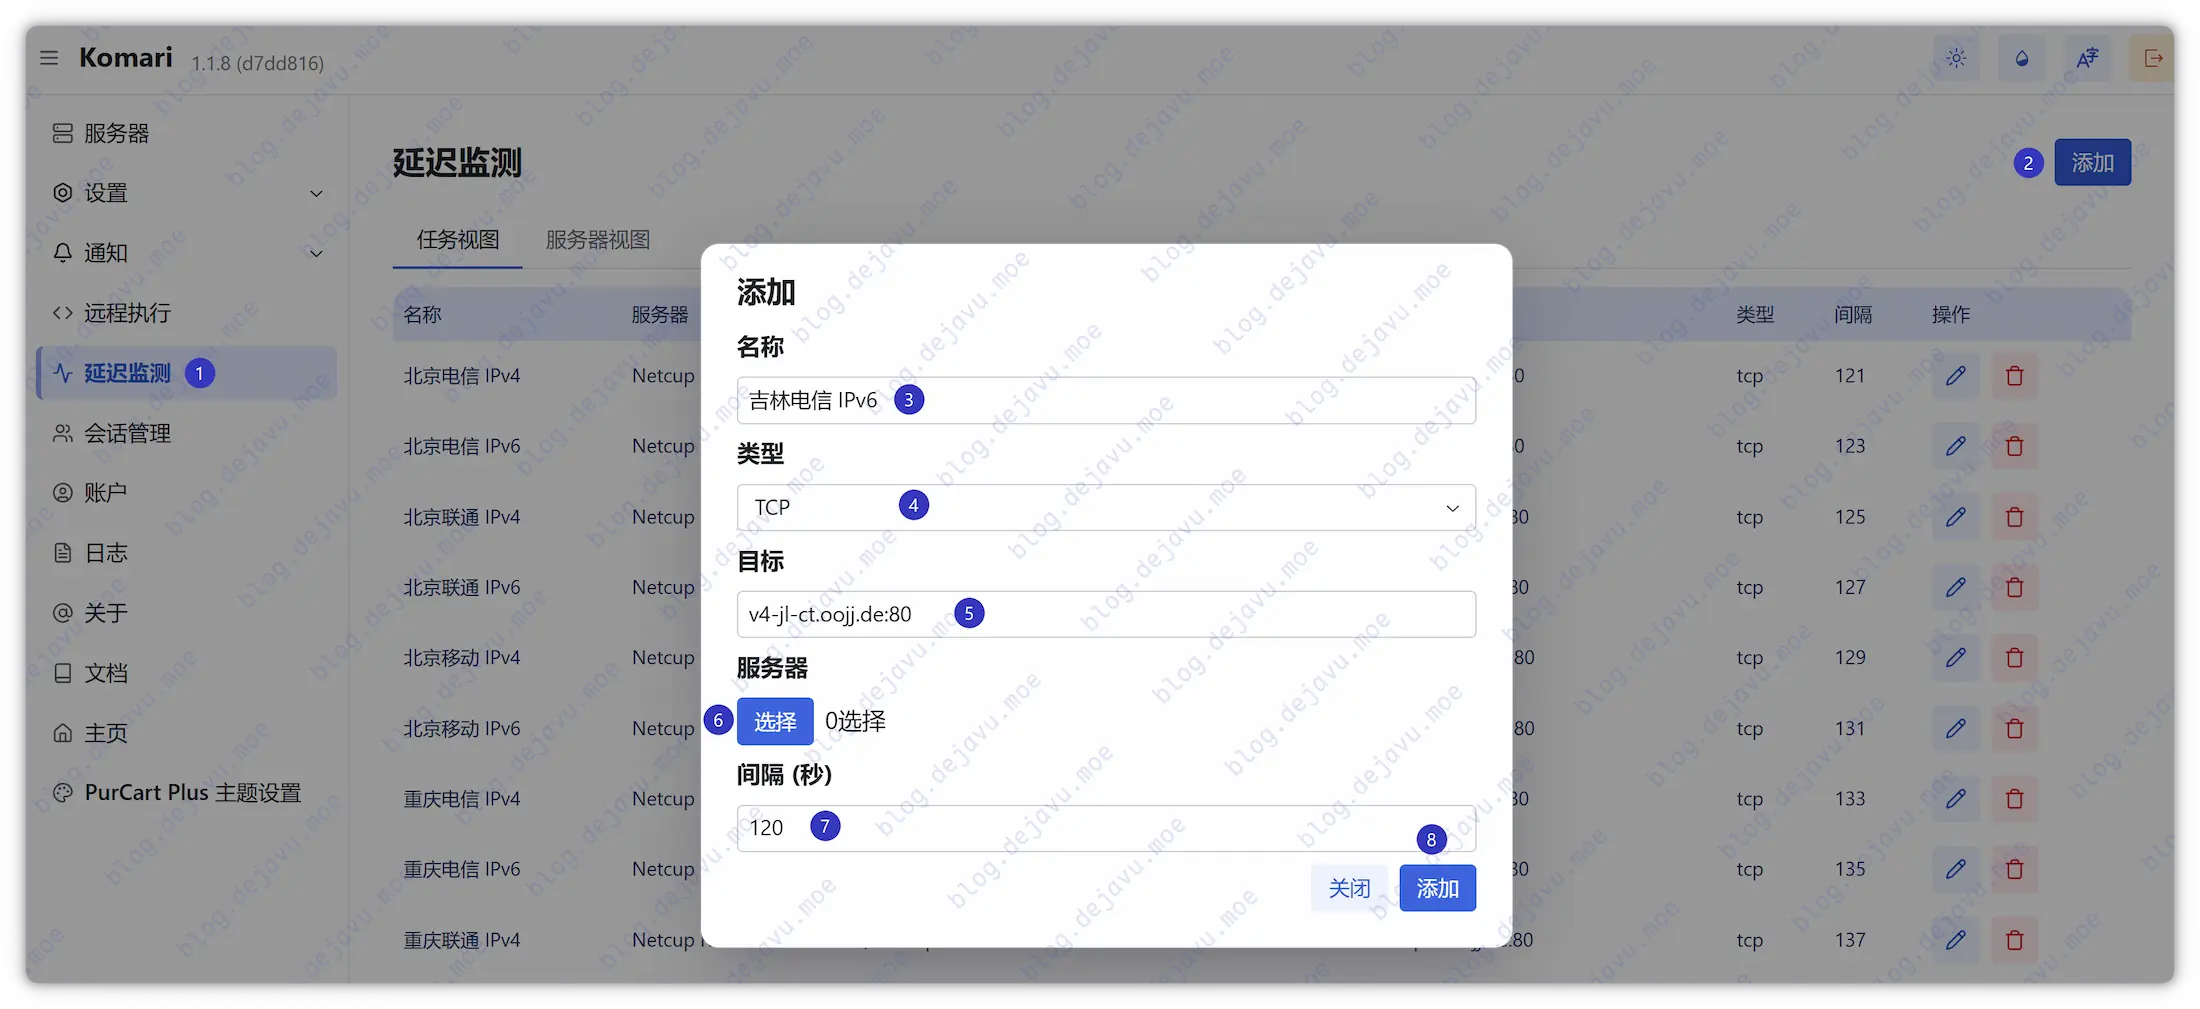
Tip: Interval defaults are better raised slightly to prevent massive data accumulations in short durations on backends.
Editing Node Info#
Under this page, basic specs, subscription costs, and expiration milestones for monitored nodes can be seamlessly managed together.
Conclusion#
In summarizing, Komari’s deployment is बेहद simple, stable, and low-overhead—essential for server collectors grids.